
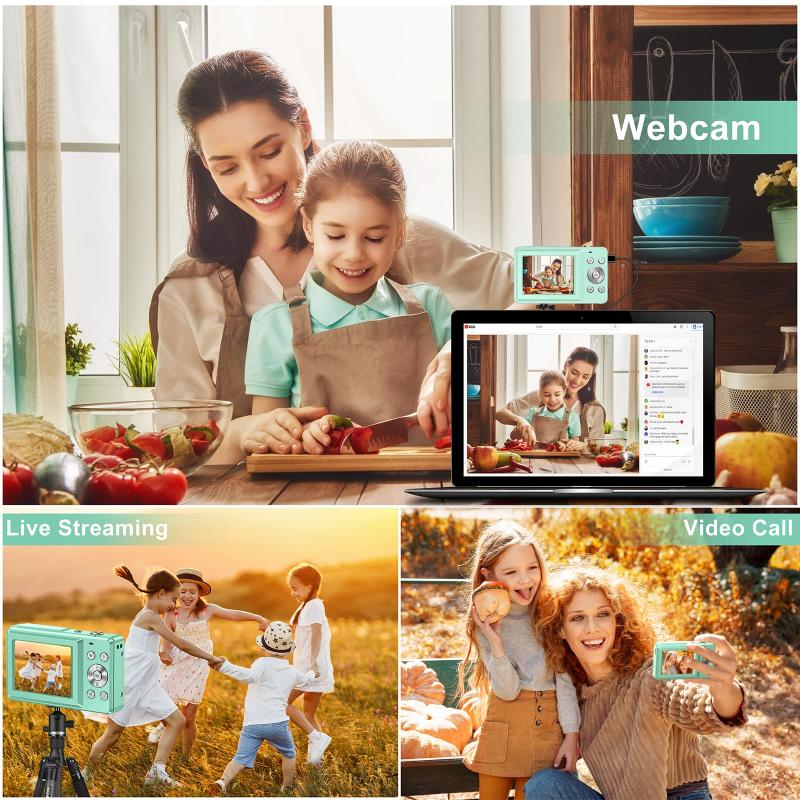
How To Set Up Digital Camera As Webcam?
As remote work and virtual meetups become increasingly prevalent, the demand for high-quality video calls has skyrocketed. While integrated laptop webcams and external webcam devices are convenient, their image quality often leaves much to be desired. If you’ve got a digital camera lying around—whether it’s a DSLR, mirrorless, or even a high-end compact—you’ve essentially been hoarding a secret weapon for professional-grade video chats. Converting your digital camera into a webcam can elevate your online presence to an unparalleled level. Let’s delve into how you can effortlessly set up a digital camera as your webcam and unleash its videographic prowess.
Why Even Bother?
Before plunging into the nitty-gritty, let’s address the big question: why use a digital camera as a webcam when you can simply purchase a dedicated webcam? The answer lies in one word—quality.
Digital cameras come equipped with larger sensors, better optics, and manual control options that far surpass most webcams. They provide superior sharpness, depth of field, vibrant colors, and better performance in low-light scenarios. If you’re a streamer, content creator, or someone who’s regularly in front of the camera for work, upgrading to a digital camera webcam is a no-brainer.
Step 1: Gather Your Arsenal
First, evaluate whether your camera is webcam-ready. Most modern digital cameras—like Canon, Sony, Fujifilm, Panasonic, and Nikon—now support webcam functionality either through direct USB connections or external HDMI capture devices. You’ll need:
1. Your Digital Camera – Check your model’s compatibility with webcam software (most manufacturers provide official software now).
2. Cable – A USB cable or HDMI cable depending on the camera’s output option.
3. Power Source – If your video conferences last for hours, you'll either need a dummy battery (an adapter that allows the camera to remain powered) or a fully charged battery pack plus spares.
4. Mounting Equipment – A sturdy tripod or desk clamp to position the camera properly. No one wants a shaky stream reminiscent of a found-footage horror movie.
5. Microphone (Optional) – Many cameras don’t deliver audio via USB or HDMI, meaning you’ll need an external microphone for professional-grade voice capture.
Step 2: Install Camera-Specific Software
Once you've assembled your gear, it’s time to install the software that links your camera to your computer. Manufacturers like Canon and Nikon have developed apps that make this step as painless as possible. Here's a brief rundown of some popular brands:
Canon: Look for the *Canon EOS Webcam Utility*. Download, install, and follow the instructions to connect your DSLR or mirrorless camera.
Sony: Use the *Imaging Edge Webcam*. It supports a wide array of Sony Alpha and RX cameras.
Fujifilm: The *X Webcam Software* is designed to convert the Fujifilm X and GFX series into webcams.
Panasonic: The *Lumix Tether for Streaming* app allows you to use Lumix cameras for live streaming.
Nikon: The *Nikon Webcam Utility* is perfect for Nikon DSLR and Z series cameras.
Not sure whether your camera brand provides such software? A quick visit to your camera manufacturer’s website will clear things up.
Step 3: Alternative HDMI Capture Setup

If your model lacks built-in webcam functionality or if you’re seeking ultra-high-resolution output, an HDMI capture device becomes essential. These devices convert the camera’s HDMI output into a high-quality video signal compatible with webcam software.
1. Buy a Capture Card: Reliable models include the Elgato Cam Link 4K or AverMedia Live Gamer Mini. These tiny gadgets connect the camera’s HDMI output to your computer via USB.
2. Configure the Camera: Enable “clean HDMI output” in your camera's settings. This removes overlays, focusing grids, and battery indicators from the video feed.
3. Install Streaming Software: Tools like OBS Studio (Open Broadcaster Software) make it easy to format your HDMI camera feed for use in video chats or live streams. OBS also lets you tweak exposure and resolution settings manually for optimal output.
While this setup involves slightly more tinkering, it ensures higher compatibility across various digital cameras—new or old.
Step 4: Adjust the Camera Settings
A great camera feed starts with smart settings. Here are a few things to tweak:
Video Resolution: Adjust the output resolution to match your desired quality. Most meeting apps cap webcam resolution at 1080p, so there’s no need to push for higher unless you're live-streaming.
Frame Rate: Select 30 FPS (frames per second) for silky-smooth video playback, or 60 FPS for a professional-grade gaming stream.
ISO and Aperture: Balance ISO settings for appropriate brightness, and fine-tune aperture for creative depth of field (blurry background aesthetic).
White Balance: Match your camera’s white balance to your room lighting for accurate color reproduction.
Focus Mode: Set your camera to continuous autofocus (AF-C), so you stay sharp even if you’re prone to sudden yawning or momentary distraction.
Step 5: Handle the Audio Conundrum
Most digital cameras don’t transmit audio alongside video via USB or HDMI. However, this isn’t a dealbreaker because external microphones or headphones with built-in mics often provide cleaner, richer audio than your camera’s onboard mics.
Plug in your mic and set it up in your chosen video-conferencing software. Alternatively, you can use the camera’s microphone with a stereo cable if your model supports it, though the results might not match a dedicated mic.
Step 6: Test, Tweak, and Bask in Glory
Once your hardware is in place, software is installed, and settings are optimized, it’s time to test your setup. Open Zoom, Microsoft Teams, Google Meet, OBS, or any other app you plan to use. Select your camera as the video source under settings. Troubleshoot any technical issues early, and confirm your camera’s output looks stellar.
If everything’s working swimmingly, take a moment to bask in your triumph. You’ve successfully converted your trusty digital camera into a webcam—a victory in tech wizardry worthy of applause.
Troubleshooting Common Issues
1. Camera Overheating: Some cameras aren’t designed for prolonged operation. If overheating is an issue, consider a cooling fan or reducing video resolution.
2. Battery Drain: A dummy battery adapter is essential for long-duration usage.
3. Software Lag: Ensure your computer has sufficient RAM and CPU power to process high-quality video feeds. Close unnecessary apps that could hog system resources.
4. Focus Problems: Continuous autofocus should suffice, but if your visuals appear soft or blurry, experiment with manual focus.
5. Connection Issues: Double-check cable connections or reinstall software drivers.
Final Words
There’s something undeniably satisfying about this transformation. By repurposing your digital camera as a webcam, you're turning your home office or streaming setup into a premium production studio without shelling out for overpriced gadgets. Whether you’re pitching a big idea in a virtual meeting or streaming gameplay to your legion of fans, the image quality of a digital camera ensures you always look your best, even if your banter doesn’t match your videographic flex. And let’s face it—how often do we get to turn tools we already own into something this cool?


")


")

")
 + Filter Pouch for DSLR Camera Lens Nano-Klear")
")


 & Circular Polarizing Filter CPL 3 in 1 Lens Filter with 18 Multi-Coatings Nano-Klear Series")


