
Metal Detector How To Open Battery?
Metal detectors, those curious devices that let us trace hidden treasures beneath the soil or secure airports from potential threats, are surprisingly simple in their design yet elegantly complex in their function. If you've found yourself staring at your trusty metal detector wondering how to open its battery compartment without accidentally breaking it, this guide will walk you through the procedure, explaining not just the "how," but a bit of the "why" as well.
First, let's take a moment to appreciate why knowing this process correctly matters. Metal detectors come in a bewildering variety of shapes, sizes, and designs, ranging from professional-grade, waterproof models to the hobbyist tools used in backyards or beaches. Consequently, their battery compartments—not unlike a treasure chest you might find while hunting—are often equipped with special locking mechanisms, protective seals, or hidden tabs designed to keep the batteries safe from environmental elements like dust, moisture, and impact. If you're not careful, opening the compartment the wrong way might damage its integrity or render the device unusable. And no one wants a metal detector that can't detect metals anymore, right?
Before you start poking and prodding at your device, locate the user manual that came with it. If you’ve thrown it into that proverbial drawer of forgotten papers or long since misplaced it, fear not—most manufacturers host downloadable versions on their websites. The manual will often highlight the battery type used (common ones range from AA and AAA batteries in hobbyist models to rechargeable lithium packs in advanced detectors) and the exact compartment design.
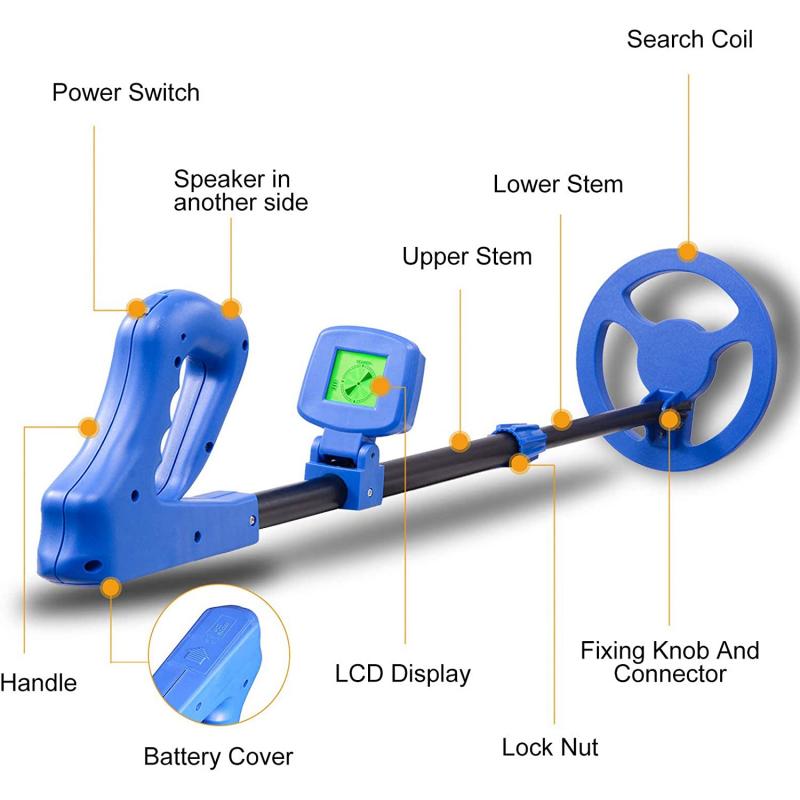
Typically, finding the battery compartment is straightforward: it’ll almost always be located around the handle or shaft of the detector for quick access during use. On some models, particularly waterproof detectors, it might be latched on with rubber seals or screw caps to ensure that no moisture creeps in and wreaks havoc with the electronics. For non-waterproof models, the compartment may just be a simple hinged cover or sliding panel.
Step-by-Step Guide to Opening the Battery Compartment
Step 1: Inspect the Design

Take a close look at your metal detector. Many models have visual identifiers showing how the battery compartment is secured—look for symbols like arrows, "Open," or battery markings near the cover. Flip the device around and inspect the handle and shaft for potential openings. If nothing is obvious, it's likely the compartment has a recessed latch or locking mechanism that isn't immediately visible.
Step 2: Find the Opening Mechanism
There are several common designs:
1. Sliding Panel: Some detectors use a simple panel that you can slide horizontally. Try gently pushing or pulling in the indicated direction. If there’s resistance, don’t force it—double-check the manual or inspect both sides to ensure you're not overlooking a latch.
2. Screwly Sealed Caps: Waterproof detectors frequently feature threaded caps. If your detector is waterproof, locate the cap and twist it counterclockwise, as you would unscrew a jar lid. Be mindful that twisting too forcefully may compromise the seal or damage the threads.
3. Tab Latches: A small tab or lever may accompany some compartments. Gently pull the tab or press the lever until you hear a soft click indicating the compartment is released. Many tab designs are built to be sturdy—but snapping one off will be a whole new battery problem.
Step 3: Handle With Care
Once the compartment is open, carefully remove the batteries or pack inside. If your detector uses rechargeable batteries, avoid touching the battery terminals with oily or sweaty hands; corrosion is a party you don’t want to attend. Grab batteries only by their sides and set them on a clean, dry surface.
Step 4: Replace or Charge
Insert fresh or freshly charged batteries according to the indicated polarity (+/- signs). If placing rechargeable batteries back in, ensure they're fully charged—detectors notorious for sucking up power will either not turn on or give inconsistent signals if running on minimal juice.
Step 5: Secure the Compartment
Close it precisely the way you opened it, making sure seals and latches align properly. For waterproof detectors, ensure that screw caps or rubber seals are tightened but not overtightened—if you find yourself straining to twist it, take a step back and recheck the threads.
Common Pitfalls and Troubleshooting
Even seasoned treasure hunters can slip up. Here are some tips to avoid the usual accidents:
Don’t Force Anything: Swearing at your metal detector won’t unlock the compartment, but a screwdriver might irreversibly damage it. If it doesn’t budge, revisit the manual.
Check for Hidden Locking Tabs: Modern detectors often include safety tabs hidden on one side to ensure the compartment doesn’t fly open accidentally mid-use.
Inspect Seals After Opening: Waterproof detector compartments often degrade after repeated openings. If the rubber seal looks cracked or loose, consider replacing it to avoid water damage later.
Why It Works This Way
Battery compartments on metal detectors are purposefully designed to protect sensitive electronics from two major threats: environmental damage and physical impacts. Imagine metal detecting on a foggy morning at the beach—without a properly sealed battery compartment, moisture from the mist would ruin your detector. Or envision accidentally dropping the unit as you enthusiastically dig up a target. Without a firm, structured compartment, the batteries could disconnect mid-hunt, leaving you with a dead detector when you need it most.
There’s also the convenience factor. The quicker you can swap out batteries, the better—especially during a multi-hour expedition where every minute counts. This is why most designs opt for tabs, hinged panels, or screws that allow for relatively easy access without sacrificing protection.
A Final Note on Battery Types
Many modern detectors favor rechargeable lithium-ion battery packs, and for good reason: they deliver long-lasting power without requiring constant replacements. But if your model uses disposable AA/AAA batteries, consider investing in high-quality ones from trusted brands and a reliable charger system. The last thing you need is battery failure when you're this close to finding a hoard of ancient coins.
Metal detectors are marvelous tools for connecting us—sometimes literally—with buried treasures and forgotten histories. Keeping them powered up and functional is just as important as learning to wield them properly. Armed with this knowledge, you can confidently open that battery compartment and keep the hunt alive! Now, enough battery talk—it’s time to discover the relics waiting just beneath your feet.


 Screw On Polarizing Neutral Density Filter HD Optical Glass / Multi-Coated / Metal Frame and Portable 2-in-1 Selfie Stick Tripod")

 6 Pack Compatible with DJI Avata 2, Drone Accesorries with 28 Multi-Layer Coated")


 Variable Neutral Density and Polarizer for Camera Lens Nano-Dazzle Series")


