
How To Setup Wireless Mini Video Camera?
Setting up a wireless mini video camera is a journey that combines a sprinkle of technical know-how with a dash of common sense. While these pocket-sized surveillance superheroes may look simple, their powerful features often hide a layer of complexity that only reveals itself during setup. Don’t worry, though—I’ve got you covered with a step-by-step walkthrough peppered with insights to make the process as smooth as a fresh coat of paint on a smart home masterpiece.
Step 1: Know Your Gear Like You Know Your Morning Coffee
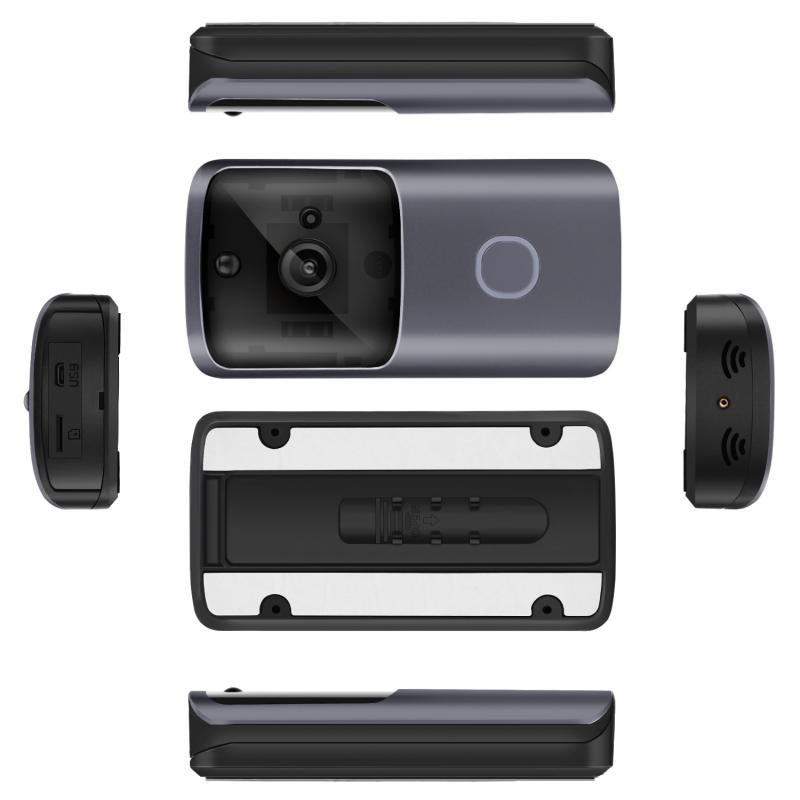
Before diving into the nuances of configuration, start by understanding exactly what you’re working with. Wireless mini video cameras come in various forms with slightly different installation requirements. Does your camera use Wi-Fi or Bluetooth? Is it battery-powered, or does it need to be plugged into a power source? Answering these questions upfront will keep you from the dreaded "why-is-this-reset-button-so-hard-to-press?" scenario later.
Next, check your included accessories—mounting brackets, adhesive pads, screws, or USB cables—and consult the user manual. I know manuals aren’t the most exciting leisure read, but trust me, skimming it beats staring blankly at blinking LEDs wondering whether they’re sending Morse code instructions for setup.
Step 2: Charge or Power Your Camera
Wireless mini cameras are occasionally misunderstood as frictionless, no-maintenance devices, but the reality is far less glamorous. Most cameras either use rechargeable batteries or need a steady power connection. Begin by ensuring that yours is properly charged or plugged in before start-up. If it’s running on batteries—great! However, depending on the camera’s usage and the environment, battery life can range from a couple of hours to several months. Note that the "monitor-the-cat" usage pattern drains less power than full-scale security surveillance.
Step 3: Connect to Wi-Fi (The Potential Minefield)
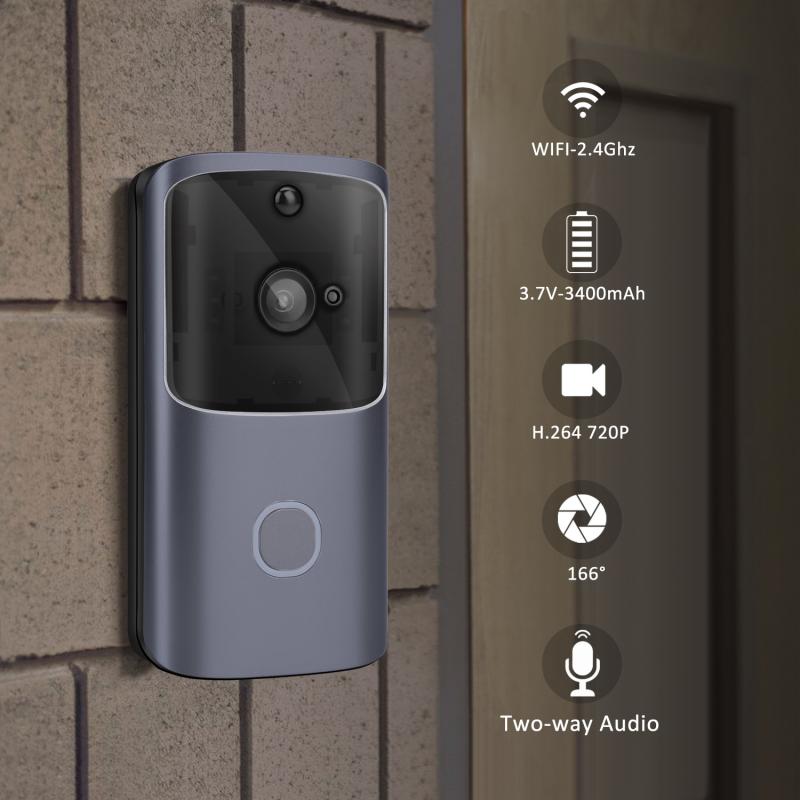
Prepare for the part of the setup that might test your patience: connecting the camera to your Wi-Fi network. This is often the trickiest step due to potential issues with signal strength, permissions, or incompatible routers. Wireless mini cameras usually operate on the 2.4 GHz frequency band (not 5 GHz). First, confirm that your router is broadcasting on 2.4 GHz and ready to party with your new hardware.

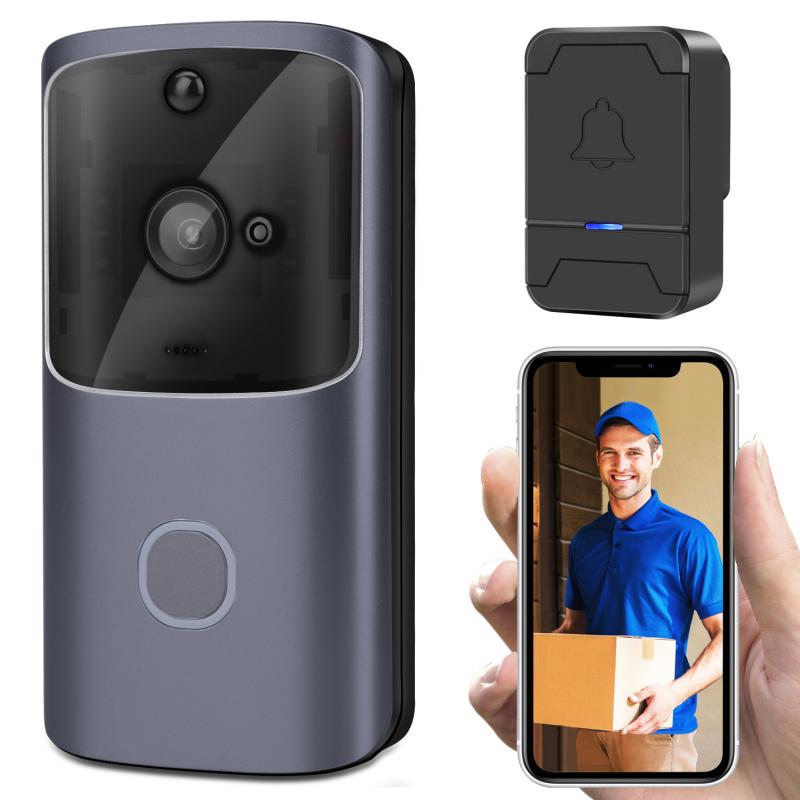
To start the pairing process, download the manufacturer’s mobile app, which typically orchestrates the connection and acts as a control hub for the camera. Ensure Bluetooth and location services (if required) are enabled on your smartphone. Follow the app’s setup wizard, and if you hit a snag—like endless "searching for device" messages—try resetting the camera (often done by holding a hidden button for X seconds).
Pro tip: Place the camera within 5-15 feet of the router during setup to minimize interference. Once successfully paired, you can reposition it at its permanent monitoring location.
Step 4: Update Firmware (Yes, Really)
You know how you groan at software updates on your phone but grudgingly install them anyway? Apply that same energy here. Updating the camera’s firmware is crucial because it patches security vulnerabilities, improves performance, and ensures compatibility with the latest app features. The manufacturer’s app should indicate whether an update is available; typically, one click (or tap) sends the firmware updating on its merry way.
Don’t skip this step—even if you’re eager to jump into surveillance mode—to avoid future headaches.
Step 5: Positioning the Camera (The Art of Spying Without Breaking Anything)
You’ve got the camera configured and connected—congrats! Now, the placement decisions begin. Where do you want this device to nest and flex its observation muscles? Mini cameras are versatile, often letting you mount or stick them in various inconspicuous locations: bookshelves, corners of rooms, or behind plants, for example. Effective positioning depends on your specific use case:
- For home security, maximize coverage by selecting a high vantage point angled downward.
- For monitoring pets, place it close to their favorite play or rest areas.
- When using it for nanny cams or general observation, choose a location with both privacy for the surveilled and optimal visibility for the camera.
Test the angle and field of view (using the app’s live feed). Check for obstructions that could compromise image clarity, such as blinds, large furniture, or misplaced vases—especially if the latter had dreams of one day becoming modern art.
Step 6: Configure Camera Settings (The Customization Station)
Done positioning? Sweet. But don’t celebrate prematurely—you still have settings to tweak. Open the app and dive into configuration options, tailoring the camera to your specific requirements. Common settings include:
Motion Detection Sensitivity: Too sensitive, and you’ll get alerts every time a fly buzzes across the screen. Not sensitive enough, and you’ll miss the key moments (like when your dog decides to reenact the plot of *Mission: Impossible*).
Audio Monitoring: Some cameras allow you to monitor audio or even use two-way talk functionality. This feature is perfect for security or reassuring your pet that you haven’t abandoned them for good.
Resolution & Frame Rate: Opt for higher resolution (1080p or higher) for crystal-clear footage—assuming your Wi-Fi agrees to cooperate. If you’re conserving bandwidth or storage, lower settings should suffice.
Cloud vs. Local Storage: Depending on your model, you can save footage to a cloud account, your device's storage, or a microSD card. Cloud storage often involves subscription fees, so weigh the cost against how much footage you realistically need.
Step 7: Test, Test, and Test Again
Now it’s time for the audition—the moment where the camera gets to show off its surveillance skills. Use the app to review the live feed and playback stored footage. Walk around the monitored area, triggering the motion detection to confirm that it works. If notifications aren’t promptly sent to your phone, revisit alert settings in the app.
Pro tip: Testing under low-light conditions helps confirm whether the night vision feature (if available) performs well. Some cameras default to grayscale imagery for night shots but maintain remarkable clarity when illuminated correctly.
Step 8: Maintain and Adjust Over Time
Congratulations, your wireless mini camera is officially chugging along! But wait—keeping the system running smoothly requires periodic checks. Here’s how to ensure it remains fully operational:
Clean Camera Lens: Dust and smudges can accumulate over time, ruining footage quality.
Monitor Battery Levels: If rechargeable, set calendar reminders to juice it up.
Review Footage Regularly: Analyze captured videos to ensure all angles are covered—and as a bonus tip, laugh at the candid moments you never intended to capture.
Think of maintaining this camera like maintaining a relationship with your favorite streaming service; commitment pays off, and the benefits often outweigh the effort.
To sum up, setting up a wireless mini video camera is like blending the best of both worlds: intelligent technology meeting human ingenuity. Follow these steps, sprinkle in trial and error, and soon your camera will be running with the precision of a symphony conductor wielding state-of-the-art binoculars.


")
 Variable ND Filter and CPL Circular Polarizing Filter 2 in 1 MRC 28-Layer for Camera Lens No X Spot Weather Sealed")
 Variable ND Filter Neutral Density Filter for Camera Lens Ultra-Slim, Multi Coated")


