
How To Fit A Dash Cam Camera?
In a world teeming with sudden stops, unyielding drivers, and the occasional unexpected meteor sighting (don’t laugh—Google "Chelyabinsk meteor"), dash cameras have become the unsung heroes of our modern driving lives. They’re not just gadgets; they’re eyewitnesses that never blink, never forget, and never skip a beat. But how do you actually go about fitting one of these devices in your car without turning it into a DIY disaster zone? Fear not. By the end of this guide, you’ll be the Picasso of dash cam installation—minus the creative mess.
Step 1: Choose the Right Dash Cam for Your Needs
Before we even think about the install, let’s talk camera tech. Dash cams come in varying configurations: single-lens, dual-lens, or panoramic setups. Are you a minimalist who only needs forward-facing coverage? Or do you fancy yourself the director of a car-chase scene and need front and rear action? Consider resolution, memory card capacity, GPS integration, and Wi-Fi connectivity in your selection. Easy plug-and-play options might be tempting, but higher-end models often involve more cables and a slightly steeper learning curve.
Step 2: Visualize Your Setup—Before You Touch Anything
Here’s where most people mess up. Don’t just grab your dash cam and slap it onto your windshield. Take a moment to sit in the driver’s seat. Pretend you’re carefully mapping constellations across the dashboard. Visualizing placement is key to keeping your windshield lean and distraction-free.
Ideal spots:
1. Behind the Rearview Mirror: This keeps the camera unobtrusive and blends into your line of sight.
2. Lower Dashboard (for Adhesive Mounts): If your windshield is unusually sloped, this may be an acceptable alternative.
Be mindful of your jurisdiction’s window obstruction laws; some regions restrict mounting gadgets in specific zones of the dashboard or windshield.
Step 3: Analyze Mounting Options: Adhesive vs. Suction
Most dash cams will come with either adhesive pads or suction cups. Functionally, both work great, but here's a breakdown of strengths and weaknesses:
Adhesive Pads: These are sturdier and less likely to wiggle loose over time. However, once they’re stuck, they’re about as movable as Mount Rushmore.
Suction Cups: Convenient for temporary mounts or rental cars, but extreme weather (humidity or temperature changes) can lead to sudden detachments. If you ever see your dash cam dangling like a disgraced acrobat, you’ll know why suction cups aren’t universally praised.
Step 4: Route Cables Like a Sneaky Genius

Nothing screams amateur hour like loose wires flopping around your dashboard. Routing cables properly is crucial—not just for aesthetics but for safety too. Many people underestimate how much a stray cable can interfere with foot pedals, dashboard buttons, or airbags.
Start by plugging the dash cam’s USB or power cable into it, and then map a route across your car’s interior:
1. Tuck the cable along the windshield’s edge by wedging it under the rubber trim.
2. Run the cable down the A-pillar (the vertical edge near the side of the windshield) and into the under-dash area.
3. From here, choose the neatest route to your cigarette lighter socket or USB power outlet.
For those obsessed with clean setups, wiring kits are available to connect your dash cam directly to the fuse box. This gives your cam continuous power—useful for parking mode—but may require light electrical work. If “light electrical work” sounds like a code word for “danger,” consult a professional.
Step 5: Format the Memory Card and Update Firmware
It may not sound exciting, but this housekeeping step is vital for your dash cam’s longevity. Before recording your epic drives or mundane commutes, format your memory card to the file system recommended by the manufacturer (usually FAT32 or exFAT). This ensures compatibility with the camera and prevents storage errors.
Check the manufacturer's website for firmware updates. Dash cam firmware isn’t just about fixing bugs—it often adds new features or improves recording quality. Keep your device’s software as fresh as your playlist.
Step 6: Test and Adjust
You’ve mounted your dash cam, routed cables, formatted the memory card, and updated firmware. Great—but don’t assume it’s ready to roll just yet. It’s time for the Star Wars-esque phrase: “Bring your orientation online.”
Power up the dash cam and review the angle of its footage. Can it comfortably capture the entire road ahead without including unnecessary footage of your hood or the sky? Adjust the lens angle. Dash cams are best utilized with a view that captures the horizon and edges of the windshield.
Step 7: Set Recording Preferences
Most modern dash cams give you many ways to customize how footage is saved. Whether you prefer continuous loop recording, motion detection triggers, or automatic file overwrites, this is where you tailor it to your lifestyle.
Also, consider enabling:
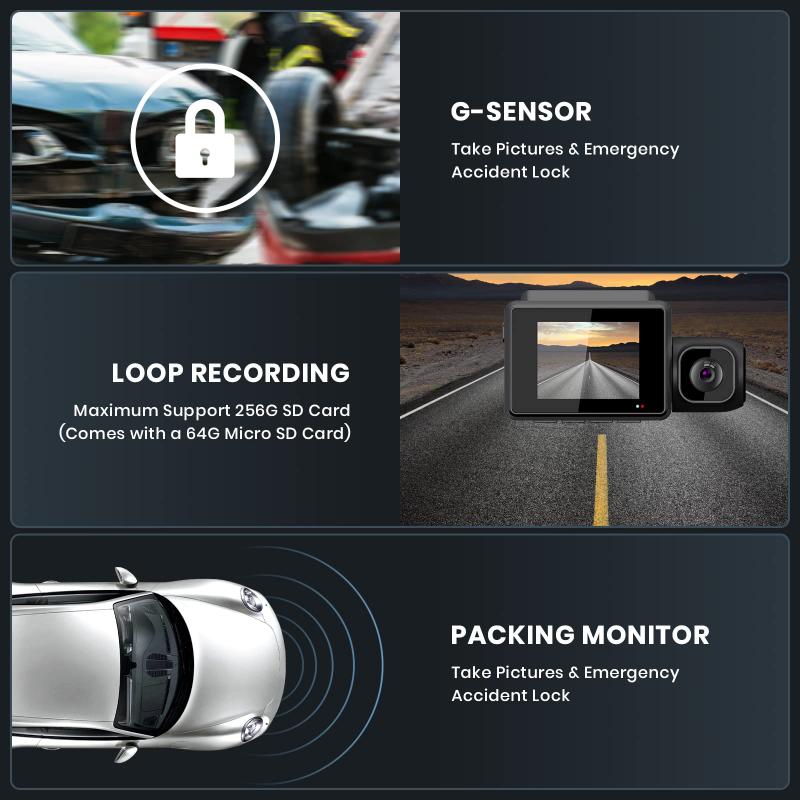
G-Sensor Recording: This feature locks footage whenever it detects sudden jerks or impacts.
Time and Location Stamps: These are a game-changer for insurance claims and legal evidence.
Step 8: Don’t Forget About Regular Checks
Dash cams are remarkably resilient gadgets but even they require periodic attention:
Storage Maintenance: Routinely format or clear older files to prevent memory card corruption.
Lens Cleaning: A dirty lens is an unwelcome guest in your cinematic captures. Wipe it gently with a microfiber cloth.
Cable Inspection: Loose or frayed wires can lead to inconsistent power supply and recording glitches.
Clever Tips to Outshine the Average Installer
1. Fuse Tapping for a Pro-Grade Look: If you’re feeling adventurous, use a hardwire kit to connect power to your car’s fuse box. This not only frees up your cigarette lighter but also enables parking-time surveillance.
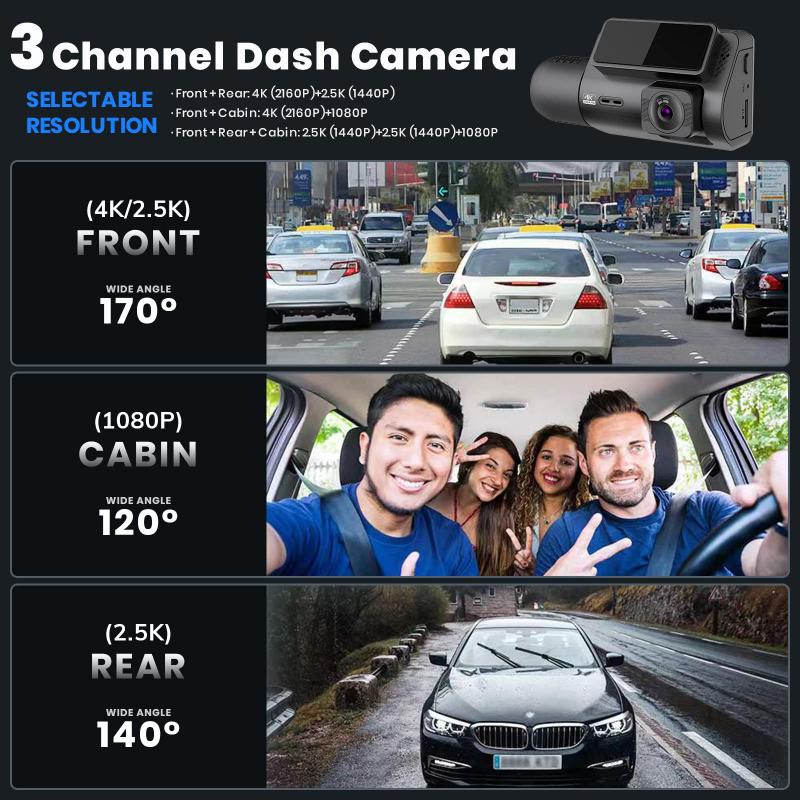
2. Dual Cameras: If you’re using a dual-camera setup for rear-facing shots, follow the same cable-routing technique for the rear camera along the car frame.
3. Mobile App Control: Many dash cams have allied smartphone apps that let you access footage, manage settings, and update firmware wirelessly. Don’t neglect this modern perk.
With these steps locked and loaded, you’ve transformed yourself into a dash cam whisperer. Not only are you preserving your insurance premiums and safeguarding road trip memories, but you’re also a step ahead in the grand plot twist of any traffic incident. Go forth, my technologically empowered friend—keep your journeys well-documented and your dashboard cable-free!


 & Black Mist 1/4 Filter with 18 Multi-Coatings for Camera Lenses Nano-Klear Series")


