
Where To Set Up Trail Cameras?
Trail cameras are an ingenious tool for nature lovers, hunters, wildlife researchers, or anyone just trying to keep tabs on what's going on in the woods or their backyard. Behind the seemingly straightforward task of setting up a trail camera lies a combination of strategy, knowledge, and technique. Proper placement can mean the difference between a memory card full of mundane snapshots or one that contains the entire Netflix-worthy saga of your neighborhood wildlife.
Before diving into the nitty-gritty, let’s establish a foundational truth: trail cameras aren’t magical devices that attract wildlife like opening candy wrappers in a bear-infested forest. To make them effective, you need to learn where and how to place them for optimal impact. It's part science, part art, and maybe just a pinch of luck.
Understand the Goal of Your Setup
Your reasons for using a trail camera will dictate where and how you place it. Are you scouting for deer ahead of bowhunting season, monitoring nocturnal critters for scientific research, or hoping to catch that pesky squirrel that’s stealing tomatoes from your garden? These objectives are key in defining camera placement. For instance, setting up your camera near deer trails won’t do much for finding out if your garden pilferer prefers organic heirlooms.
Do Your Reconnaissance Work
Wildlife doesn’t move randomly; they follow patterns dictated by food sources, water, shelter, and mating seasons. The art of trail camera placement often begins with scouting the terrain and picking up on these cues. Water sources like ponds, streams, and rivers are excellent targets, as animals need hydration just like the rest of us. Game trails, or beaten paths that animals frequently use, are prime real estate for your camera.
Look for signs of recent animal activity. Does the ground show hoof marks or paw prints? Are branches broken or rubbed as if an elk used the tree as a scratching post? Is there droppings evidence nearby (and did you gag inspecting the clues)? These subtle indicators can be more telling than you think.
Harness the Power of Structure
Animals are creatures of habit, and they often funnel through terrain in predictable ways. When scouting a location, keep an eye out for natural funnels created by the landscape — that is, areas where land features force animals into tight corridors. Think ridges, gullies, creek lines, or thick vegetation that narrows movement options. Bucks, for example, often walk parallel to ridges or use saddle points between hills as “gateways.”
Manmade structures are also wildlife magnets. This includes fences, old farm roads, or edges between fields and forests. Animals love boundaries; edges create transitional habitats where prey and predators alike thrive.
Understand Wildlife Behavior for Timing
Thinking not just in space but also in time will level up your approach. If you’re targeting deer, then knowing about their daily cycles — especially feeding times — can play a huge role. Position your camera accordingly near food plots that they frequent either at dawn or dusk (their preferred hours).
Similarly, animals’ behavior changes with the seasons. During the rut (mating season), bucks will display territorial dominance, which often includes scraping trees and marking the ground. Capture their hormone-fueled hubris by identifying these territorial scrape spots and fixing your camera nearby.
Choose the Right Camera Height
One common rookie mistake? Mounting the camera either too high or too low. Wildlife doesn’t look its best from awkwardly skewed angles, and a poorly mounted camera might also miss vital motion detection. To photograph four-legged creatures like deer or coyotes, a height of 3 to 5 feet off the ground is ideal.
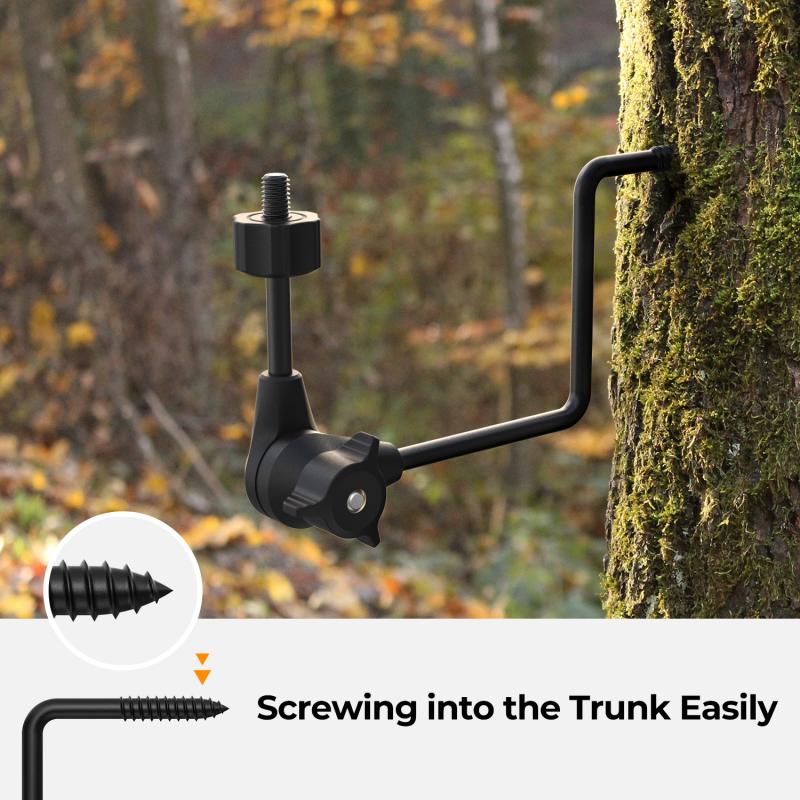
Securing the camera to a tree trunk or sturdy post gives it stability, but avoid letting branches or leaves obstruct its field of view. You’re looking for an unobstructed, wide-angle shot of thoroughfares and target zones.
Think Like a Spy – Use Cover and Camouflage
While wildlife often isn’t tech-savvy enough to notice an out-of-place camera that could compromise your setup (we think), making an effort to blend the camera into its surroundings is still wise. Animals can be sensitive to the faint infrared glows emitted even from flash-equipped trail cameras, and overly conspicuous gear might stir their suspicion.
Camouflage your camera by securing it to a tree with bark-colored mounts or housing it in natural foliage. Bonus tip: check whether vegetation is likely to sway in the wind and trigger unnecessary snapshots. Nothing is more frustrating than rifling through 300 photos of blurry leaves.
Optimize Angles and Orientation
The devil’s in the details, folks. If you’re monitoring warm daylight hours, orient the camera to avoid directly facing the sun — unless you love stark white images of solar flares. Animals are often more active under shady cover, so let geometry and light-limiting placements work to your advantage.
Similarly, highly frequented sites like watering holes or mineral licks deserve a wide vantage point. Trail cameras with wide detection zones or multi-photo burst capabilities can help cover high traffic areas better.
Be Patient and Conservative About Visits
This one stings for the impatient among us. After placing your camera, resist the temptation to sneak back and check every day. Frequent visits can leave scent trails, spook wildlife, or unnecessarily disturb the environment. Ideally, let the camera run undisturbed for weeks — most modern devices have long battery lives and huge storage capacities built for extended deployment.
Deploy Decoys: The Human Hack
For opportunists capturing backyard wildlife, why not get a bit playful? Animals behaving naturally might wander into the viewfinder, but you can actively bait them to establish patterns or increase the likelihood of interesting behavior. This is where food or attractants come into play — though baiting can have ethical and legal implications depending on your location. Wildlife that’s habituated to certain feeding sites might also learn to game your tactics, so use this method judiciously.
Check Your Gear – Before You Leave!
Few things will ruin your field research or surveillance faster than untested equipment. Are the batteries fully charged? Is the memory card empty and formatted? Did your last-minute software update accidentally change settings? Double-check every parameter before venturing outdoors.
Learn from Results – Adjust Your Approach
If your initial setup returns nothing but empty scenes or neighborhood cats, take this setback as valuable feedback. Move the camera, adjust angles, or expand the search radius. Trail cameras are exercise in adapting, as wild animals rarely leave neatly pinned schedules.
In conclusion, setting up a trail camera is all about thinking strategically, adapting to the terrain, calibrating your gear, and finally holding back from checking it every hour like you’ve got a wildlife Instagram influencer contract. Once you nail the technique, sitting down to browse through the captured snapshots is like unwrapping the best holiday gift imaginable — candid, unfiltered highlights of the nature show happening beyond the human spotlight.


")

")


 with 3 Vacuum Cleaning Cloths Nano-Klear")


")


